
When making pictures, keep this in mind: Light illuminates, shadows define.
No light, no picture.
No shadows, no definition.

Lightroom has more tricks up its sleeve than simple photo fixes such as exposure and contrast. It’s possible to craft images inside Lightroom and, in many ways, the tools in Lightroom make the task easier than it would be in Photoshop or another editing program.
In this post I’ll show you a way to turn a relatively hum drum image into something much more visually exciting. So, when you don’t get the image you want straight out of the camera see if, armed with some simple Lightroom tools, you can coax some better results from it. Remember too that this is a creative technique – you’re not looking for realism as much as a way to create a different look for your image.
Start out with an image that has what I call “good bones”. It needs to be pleasingly composed and it needs to have something that compels you to want to look at it and to spend some time working with it. Good contenders for this process are images with interesting skies and these include heavy clouds and clouds captured at sunset and sunrise.
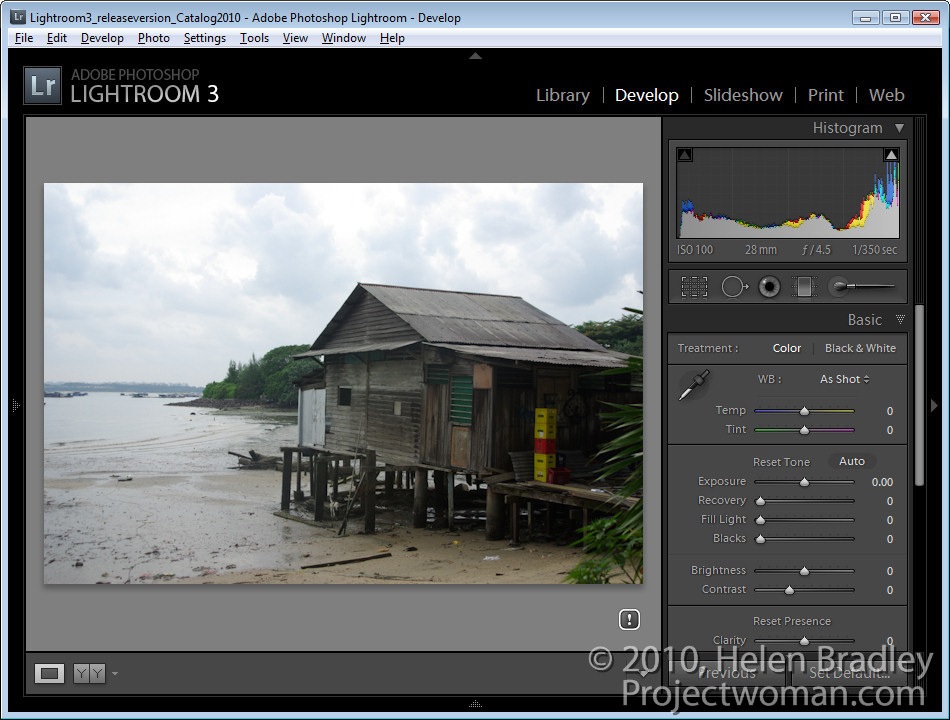
In the Develop module use the adjustments in the Basic panel to apply global adjustments to the image. I focus in detail on the adjustments that aren’t available in the Adjustment Brush and Graduated Filter such as Blacks, Fill Light, Recovery and Vibrance.
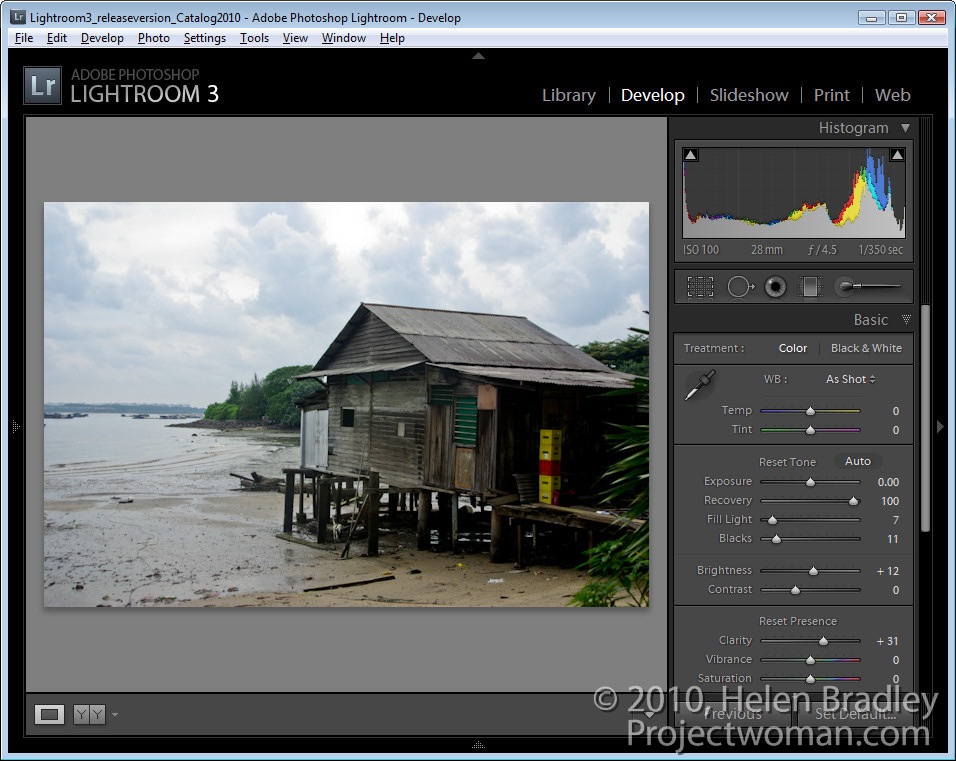
I will adjust the Recovery slider at least half way to the right and adjust Fill Light to get some detail from shadows. I’ll adjust the Blacks even to the extent of plugging some shadows for now. I’ll also use other adjustments such as Exposure and Brightness just as a start.
The fact that none of these changes are permanent is a big plus because if you don’t like the results later on you can come back and readjust them.
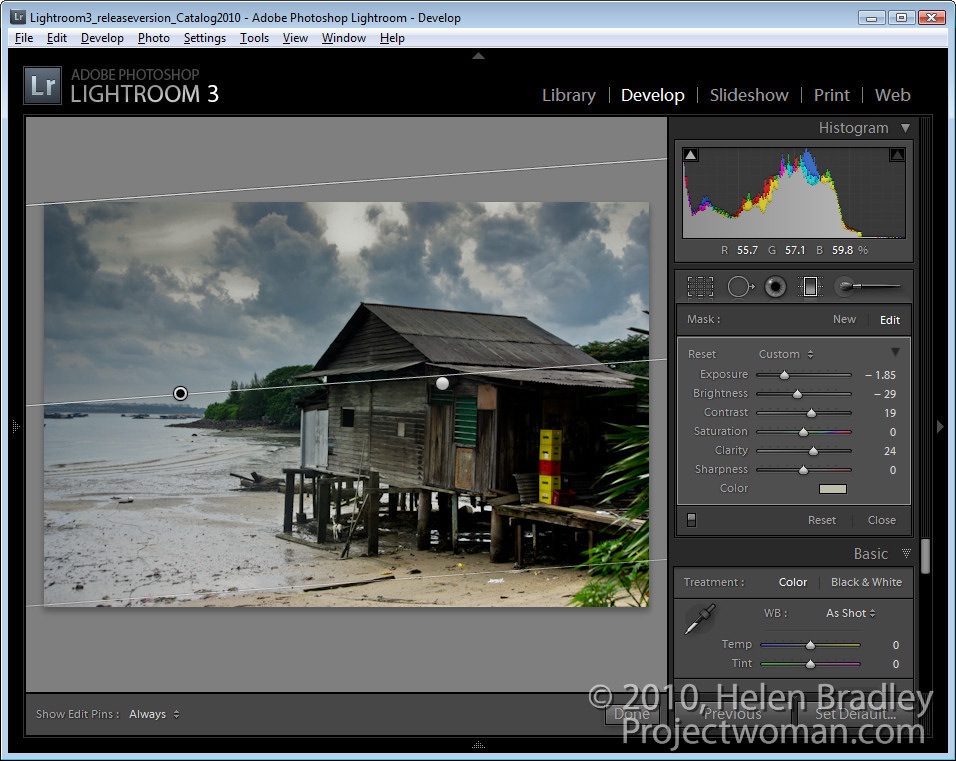
Having dealt with the overall image I’ll now turn my attention to parts of it. Here there are three areas in particular – the hut and bottom right of the image, the bottom left and the sky.

Starting with the hut I’ll drag the Graduated filter in from the bottom right of the image. Then I’ll bring some detail out in that area by adjusting Brightness, Exposure and Clarity.
The sky is treated the same way as the hut. This time the Graduated Filter is dragged down from the top. Then I decreased Exposure and Brightness to reveal the detail in the clouds. I added some Contrast and Clarity and a hint of dull yellow color.
In the bottom left of the image another Graduated Filter adjustment fine tunes this area of the image and adds a hint of dirty yellow color. Reducing both Sharpness and Clarity softens the details here.
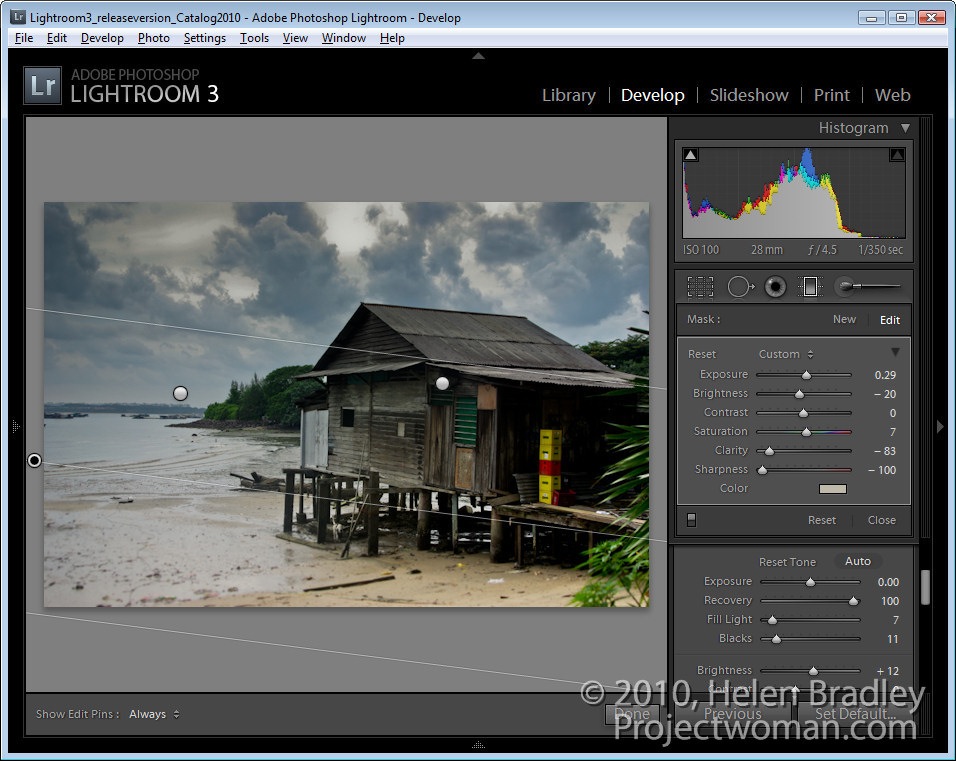
At this point I might consider adding a second Graduated Filter over the top of this one to again reduce Clarity to soften the details even more. The Graduated Filter can be used cumulatively so adding one on top of the other enhances the effect.
Once I’ve finished with the Graduated Filter, I will return to the Basic panel and fine tune the settings there. Here I adjusted the Brightness and Fill Light to lighten the image a little.

At this point I cropped the image to remove some excess detail from the bottom and right edges to focus interest more in the water and the hut.

To finish, I used the Adjustment Brush on the plastic crates. By painting over them with the brush and reducing the Exposure slightly they are made a little less distracting.

At any time I can revisit any of the changes I have made including those applied with a Gradient Filter or the Adjustment Brush and adjust the settings if desired.
Not every image will lend itself to this treatment but many will. You should note too that here I was working on a jpg image and because of the in camera processing applied to jpg images and the fact that much of the data that the camera captures is discarded in the process of saving an image as a jpg, the scope for adjusting this image was significantly less than would have been the case if I had the image captured as a raw file.
Yesterday we met up with our friend Sasi with a very simple goal in mind – to go to an unknown location, with an unknown agenda and see what kind of pictures we get out of it ![]() Why you may ask? Well other than the fact that it’s a ton of fun being plunged into the unknown, the idea was to get inspired and spark creativity – which happens to be the basis for our upcoming joined workshop (more on this coming soon).
Why you may ask? Well other than the fact that it’s a ton of fun being plunged into the unknown, the idea was to get inspired and spark creativity – which happens to be the basis for our upcoming joined workshop (more on this coming soon).
Here are some pics from the day…enjoy ![]()


Let me explain this last one since it clearly doesn’t seem to belong here… ![]() This was taken from the car (with the trusty 70-200 f/4), on the way back from our little excursion. The exact location of this little gem is unknown since we stumbled upon it by complete accident on the way back from Oshawa. We took a rural road and explored a little bit, and voilà!
This was taken from the car (with the trusty 70-200 f/4), on the way back from our little excursion. The exact location of this little gem is unknown since we stumbled upon it by complete accident on the way back from Oshawa. We took a rural road and explored a little bit, and voilà! ![]()

I think everyone was excited to see the winter go, and frankly we were itching to take the cameras out without having to dress like polar bears ![]() Also, since the lensbaby has been sitting idle in the bag for quite a while now, we figured we should dust it off and take it out for a spin.
Also, since the lensbaby has been sitting idle in the bag for quite a while now, we figured we should dust it off and take it out for a spin.
Lensbaby is essentially a specialized lens used to blur out all but a small portion of the image (called the sweet spot) and thus create a “blur vignette” so to speak. It can be a really cool effect, as long as it’s not overdone. Aside from the first 2 images which were taken with Canon 50mm f/1.4, all the others are lensbaby babies ![]()


Lensbaby is a funny little thing, and even though the glass itself is not the greatest, the quality of the images still surprises us. At f/2.8 it becomes very usable, but you have to nail the sweet spot just right otherwise your subject will be too soft.

The challenge with the lensbaby lies mainly in focusing. It’s not just that it’s manual focus, but the fact that you’re often not 100% certain where the sweet spot is – especially if you move it away from center. It can become quite an exercise in patience, although live view with digital zoom does help tremendously.

I find that the technical difficulties with focus really force you to slow down, step back and think about what you’re doing before releasing the shutter. The slow process is a welcome change from event photography – it feels almost like taking a vacation ![]()

My only complaint is edge softness. If you move the sweet spot away from center and to the edge of the frame on a full frame camera (such as 5DMK2) the reduction in sharpness becomes unacceptable. However on a crop body, results are much better and the corner softness issue essentially goes away.

It is honestly difficult to think of a $350 lens that is as fun to use as the lensbaby. Any kind of specialty lens would cost at least twice as much, so I really think there’s plenty of value here. Needless to say, it will keep you occupied for quite a while.

 Just wanted to say a big 'thank you' to my friends at Unique Photo in Fairfield, NJ, for putting together yesterday's HDR seminar/workshop at Unique University and Kip's Castle.

If you've ever watched a magician performing a trick, you know it's not really magic, but it sure can look that way. The same is true of the newContent-Aware Fill feature in Photoshop CS5. I mentioned this feature back in May when did my first hands on write-up on the new features of Adobe's latest creation but I've gotten several questions about it since then and wanted to take this opportunity to cover it more fully.
At the time I first mentioned Content-Aware Fill back in May I mentioned how fun it was but also alluded to having somewhat mixed feelings about its awesome capabilities. It makes it almost too easy clone out unwanted elements in an image. But it can be used for good as well as evil.
The most obvious use of Content-Aware Fill is to get rid of dust spots, lens flare or other unwanted distractions from an image. This is basically the sort of thing previously done with the clone stamp, patch tool or spot healing brush. Content-Aware Fill can do a much better job than either of these in most cases, and it can do so more easily.
 To use Content-Aware Fill, you first need to select the area you want to work on. Use the Lasso or whatever your favorite selection tool is to draw around the object you want to make go away. Make sure it's completely within the selection boundary. You can be afford to be a bit sloppy if you want in terms of including background and other objects beyond the area to be patched, but make sure you don't leave out part of what you want Photoshop to work on. When you have a selection you think will do the job, it's time to fill it. Go to Edit >>Fill. In the resulting dialog, select Content-Aware from the Content dropdown box and click "OK." Photoshop will think about things for a bit and then redraw your image with the selected area replaced and amazingly well blended into the rest of the image. That's it. Conent-Aware Fill is so good it can remove huge chunks of an image if you so desire, resulting in what could pass for a normal image unless you examine it quite closely.
If you only have a small area to patch such as a dust spot, you should also be aware that Adobe has also added this new "content aware" capability to the Spot Healing Brush. In fact, as of Photoshop CS5, the default mode of the Spot Healing Brush is indeed Content-Aware. Just pick a brush size and click on the spot in question. Presto, the spot is gone.
Now for a couple of not so obvious uses of Content-Aware Fill.
If you're into panoramic photography but never cared much for tripods, you probably find yourself with uneven final edges when stitching together series of shots to form your panorama. Perhaps you held the camera crooked, or slightly higher for some shots than for others. When you paste them all together you end up with a composite image that has correspondingly uneven edges. Even if this doesn't describe you, you may know someone who shoots this way. Or at least I do. With older versions of Photoshop, you were generally forced to crop to the lowest common denominator, creating a rectangular frame that fit without the bounds of all your images and resulting in some cases in having to cut off significant portions in some areas. Content-Aware Fill can work wonders to fill in those missing areas rather than having to cut them off.
Or perhaps you've got an image that suffers from significant barrel distortion or other optical lens problems. Photoshop and countless third party filters can let you correct such problems but can leave you with an image that is no longer rectangular. As with the plight of the haphazard panoramic shooter above, you would previously have had to crop the image, cutting off the edges to get back to a normally shaped image. Photoshop CS5 Content-Aware Fill can give you an alternative by fill in the missing areas around the edges rather than cutting off the parts that are not missing.
When using Content-Aware Fill, you may not always end up with exactly what you were hoping for, but fear not. You can always use the history panel of Control-Z Undo to go back and try again. Even slight changes in the selection used can end up with different results. Or, if you like most but not all of what you end up with, you can select that smaller area and apply Content-Aware Fill a second time. There does seem to be some tendency to end up with a jumbled hodgepodge if you do this over and over though. At some point, Photoshop will simply be filling in made-up content from previous applications of Content-Aware Fill. It seems to be far better in this regard than the patch tool is though, so don't automatically assume you need to undo everything and start over. Two or even three applications seem able to give good results in many cases.
I still do have mixed feelings about Content-Aware Fill. As digital photography tools get increasingly powerful it gets easier and easier to fake an image rather than actual shoot it. It's not like talented darkroom technicians weren't trying to do some of these same sorts of manipulations long before Ansel Adams, but now tools like Content-Aware Fill are making this downright easy for all of us.
To quote Stan Lee of Spider-Man fame, with great power comes great responsibility....
 |  |  |
| Some extreme examples of Content-Aware Fill. Hover your mose over each to see before and after versions. Each of these was done with a just a quick selection and Content-Aware Fill. | ||