2010. július 7., szerda

Lightroom – Exposure vs. Brightness

Eredeti: Lightroom Killer Tips, Matt Kloskowski
"
One of the questions I get asked the most is whether I’d use a tripod in a church to take an HDR photo but we won’t go there (sorry, I had to sneak that one in) ;)

Anyway, what’s the difference between the Exposure slider and the Brightness slider (both in the Basic panel as well as the Adjustment Brush)? They both have the effect of brightening the photo right? The main difference I’ve found is that Exposure really targets the brightest parts of your photo and makes them brighter. Almost to the point of over-exposure. And it does so pretty quickly as you increase (or decrease) the slider. Brightness on the other hand still brightens the overall photo but does it more in the mid-tone (middle gray) area. Here’s a view of a simple gradient image I created in Photoshop (By the way – you can download it here if you want to try it out for yourself) with the Highlight warnings turned on. You can see the before/afters and how each slider affects the highlights.

(Click to see a larger version)


If it’s hard to visualize what it’ll do to a photo then check out the lighthouse from a photo of mine. On the left is the result of reducing the Exposure and on the right side is the result of reducing Brightness. Notice that reducing the Exposure almost immediately gets rid of that bright highlight on the very far left side of the lighthouse. Reducing Brightness makes it all darker but keeps the brighter highlight area better. This fits with the whole idea that Exposure attacks the really bright stuff harder than Brightness does.

(click to see larger)


It also has some affect on color. Another similar gradient that I’ve created shows how moving the Exposure slider and the Brightness slider all the way to the left changes the blues, the greens, and even the yellows but in a slightly different way. I usually see this the most when I’m working on the sky and it probably explains why I usually prefer the Brightness slider to darken a sky rather than the Exposure. Personally, I just find that the result looks better (remember, this is totally a personal-taste kinda thing). But they definitely do affect color in a different way.

(Click to see a larger version)


So what’s your take on it? Which one do you use the most and why? Oh yeah, if you want to download the sample gradient images I used then just click here.

2010. július 6., kedd

Optimizing the catalog in Lightroom 3

Eredeti: The Lightroom Blog, "

In Catalog Settings in Lightroom 2, you could ‘Relaunch and Optimize’ your catalog to help speed it up. That’s gone in Lightroom 3, so here’s what you do instead.


"

Composition Week, Day 5: Shape and Form

Eredeti: The Digital Photo Experience, Rob Knight"

Detail of the EMP/SFM, Seattle, WA

[Editors Note: This week we have Rob Knight on a weeklong series of composition tips just for you. We'll have one article every day, and continuing all the way thru Saturday!]

Try making photographs that are not so literal. Instead of looking for THINGS to photograph, look for abstract shapes and designs. Isolate small pieces of a large subject and see what you can come up with. It’s fun to make a photo of a subject that everyone has seen a thousand times, but shoot it so that people ask, “what IS that?”.

Get out your macro lens and practice finding pictures within pictures. You can probably spend hours shooting in your back yard this way. Interesting shadows are also good for shape and form shots. Look for unique designs and compositions when the shadows are long at the beginning and the end of the day.

Silhouettes are a good example of a composition based on shape. The challenge is to capture the subject so that the viewer can recognize it by its’ shape alone."

One family, 30 years…

Eredeti: How to be a Retronaut
"


“On June 17th* every year, my family goes through a private ritual: we photograph ourselves to stop, for a fleeting moment, the arrow of time passing by”

- Diego Goldberg, Buenos Aires, Argentina

…..


Thank you to Andrea Kiss


*This date was first published as June 13th. Thank you to Luis (below) for pointing out the mistake.

"

How To Color Balance Your Flash With Gels

Eredeti: Digital Photography School, Peter West Carey
Flash Gels
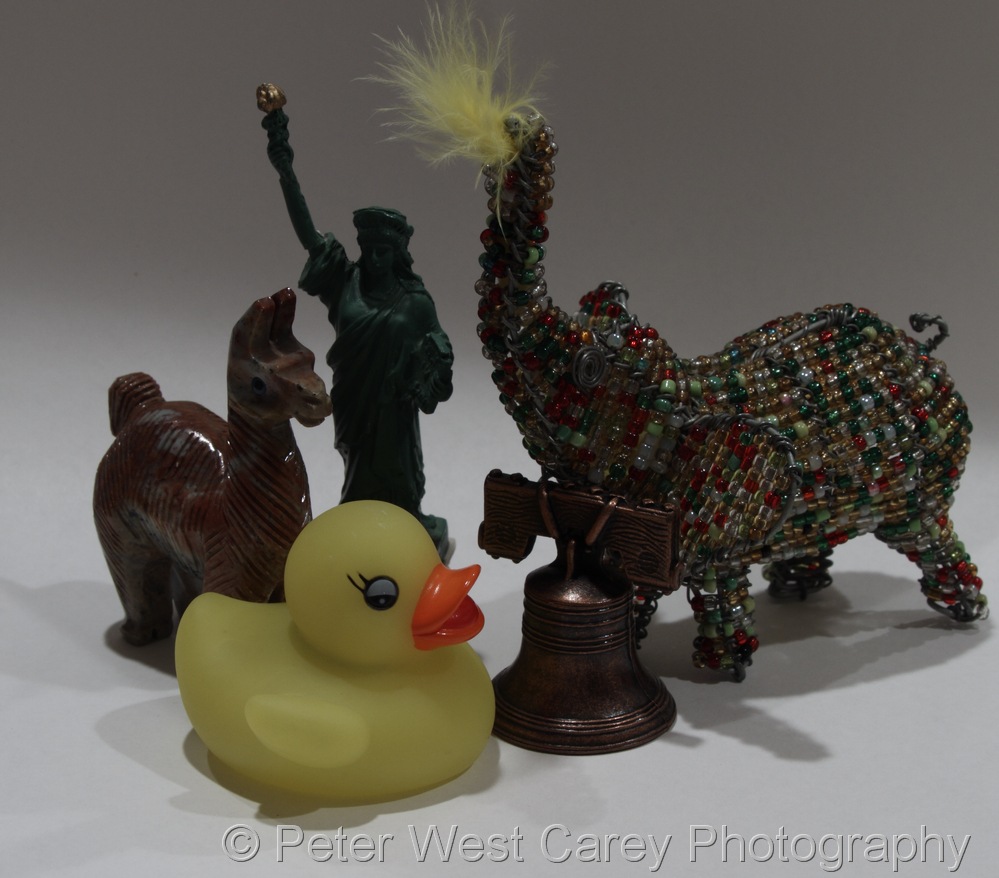
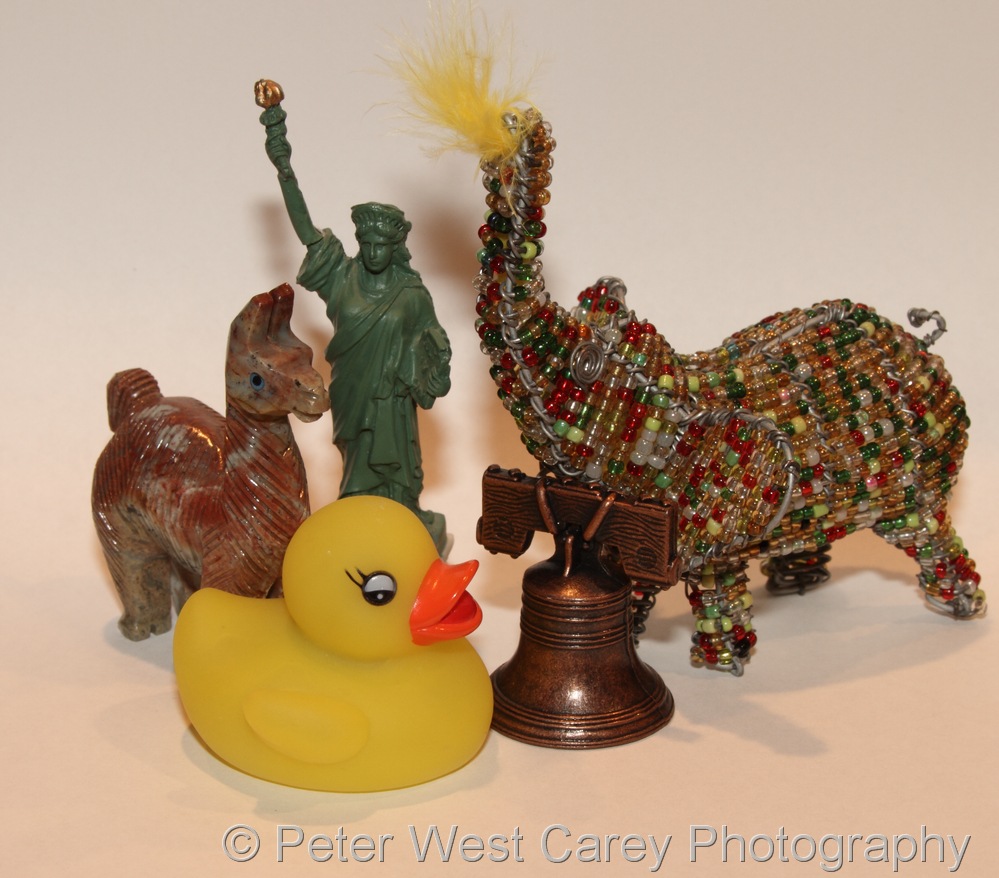
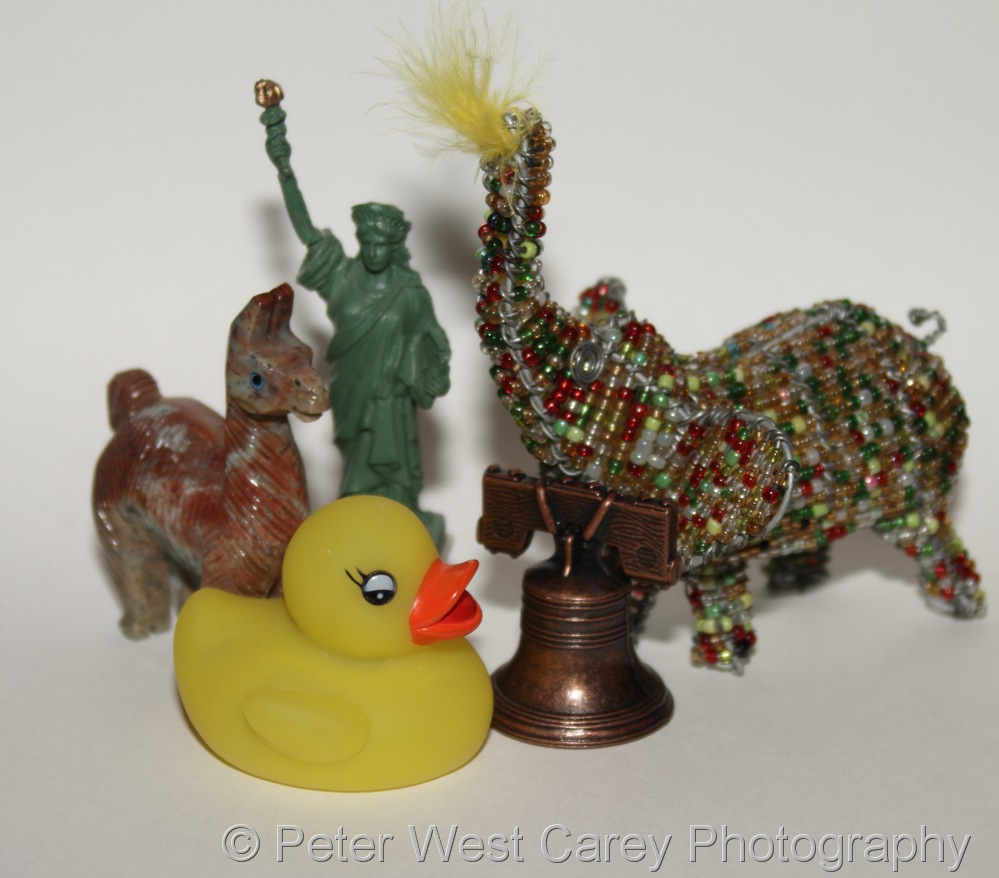
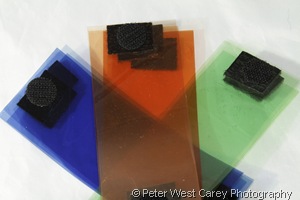
Quick, what’s the difference between the light from your flash, the sun, those crazy, twisted light bulbs and the not so crazy twisted light bulbs? Easy answer: degrees Kelvin, or the color the lights give off.  Not all light is equal and those who have done any amount of photography know how radically different light sources can be.  Even the sun light coming to the Earth’s atmosphere changes temperature as measured in degrees Kelvin as the Earth rotates.  This became glaringly apparent when color film came on the scene.  Special films were made to match the color range of certain lights.  Then came digital and its ability to magically switch between light color temperatures on the fly.
As handy as the digital revolution has been for color balancing, it still can’t make much of an impact when a flash is used in conjunction another temperature of light, like incandescent indoor lights.  We’ve all seen the photos with a slight blue-white color cast on a face and the scene behind is a sickly orange-yellow.  Or the green light given off by florescent lights.  So what are we to do to make our camera happy with the color balance selection?
Flash with GelsThe simple answer is color gels.  Specifically, color gels that approximate the color temperature of specific light sources.  There are a number of sources on the internet where these gels can be purchased and the easiest kits I’ve found come from Photogels.com.  Complete with color correction gels as well as special effects gels, and enough velcro to attach them to a standard flash, I purchased a three pack to cover all my flashes.  There are three shades of each color correction gel to help match the temperature of ambient light (NOTE: You can put velcro on both sides of the gels and stack them to further fine tune the correction) and the kit comes with gels for matching sunlight (blue in the picture above), incandescent(orange) and florescent(green).
In practice the use of gels is simple.  Just add and remove to your flash as you see fit.  The gels can even be stored on the flash, out of the way, when not in use.  To give you a better idea of how gels can affect light, I tested them out in a few different configurations when using the orange gels for incandescent (indoor) light.
First, let’s start with a baseline picture. (Thanks to my daughter for unknowingly donating some of her travel gifts)
(50mm, 1 second, f/11, ISO 100) I took a custom white balance for the overhead incandescent lights.  As the lights are directly overhead and this setup is shot on a counter, heavy shadows are cast and you can’t even see the Statue Of Liberty’s face.  So let’s use the flash to fill in what’s missing.
Flash Gels
(50mm, 1/2 second, f/11, ISO 100)  Yikes!!  With the same white balance as before, the flash is killing this picture.  The shutter is longer to get better depth of field with the closeness of the subject matter.  Well then, let’s change the white balance to flash and get rid of the blue cast.
Flash White Balance
(50mm, 1/2 second, f/11, ISO 100) Getting a little closer with the white balance now set to the flash temperature.  The depth of field is still causing the shutter to remain open for half a second.  This allows the overhead lights to cast their (now ugly) orange light on the scene.  Hmmmm, what if we cut the shutter speed down to get rid of that overhead cast?
Flash White Balance
(50mm, 1/250 second, f/4, ISO 100) Increasing the shutter speed cut down on the orange cast, but the depth of field is horrible.  It’s time to try out the gels on the flash. First we’ll use the lightest gel and work our way up.  For reference sake, let’s call the lightest gel a +1, then +2 for medium and +3 for the darkest gel.
Custom White Balance, +1 Gel
(50mm, 1/2 second, f/11, ISO 100) We’re back to the custom white balance for the overhead lights.  The flash is firing but now there is a +1 gel on the flash.  Comparing this to the second photo above (no gel, but custom white balanced the same and flash firing) there isn’t a ton of difference.  Let’s take off the +1 and try +2.
Custom White Balance, +2 Gel
(50mm, 1/2 second, f/11, ISO 100) With a +2 filter and custom white balance, we’re getting a little less blue cast from the flash, but need to keep going.
Custom White Balance, +3 Gel
(50mm, 1/2 second, f/11, ISO 100) +3 now and the color, while not popping out (truth be know, the overall white balance could be adjusted slightly, but incandescent bulbs aren’t always known for their wonderful color renditions) is noticeably less blue cast from the flash.  Let’s combine the +3 with the +1 for a +4.
Custom White Balance, +4 Gel
(50mm, 1/2 second, f/11, ISO 100) We’re at +4 and, on my screen, the background is starting to become a tad orange from the power of the flash.  But not horribly so.
Custom White Balance, +5 Gel
(50mm, 1/2 second, f/11, ISO 100) Now for +5 (the darkest gel combined with the medium gel).  The background is indeed getting orange cast and the duck is looking even more sickly.  No one likes a sickly duck.  Or llama.
Custom White Balance, +6 Gel
(50mm, 1/2 second, f/11, ISO 100) And now for +6, all the gels combined.  By this time it’s too much, but there are cases when you may need to use all three gels.
While this demonstration is a bit simplistic, I hope it helps you understand how flash gels can be used to balance out ambient light.  While there are other adjustments that can be made (such as increasing the flash output when more gels are applied as I don’t feel the E-TTL compensated enough), it serves to show how just the color can be balance.  The other colored gels work the same for outdoor light and fluorescent light.  Just note that you can’t use multiple colors at one time to balance out multiple light temperatures.

Winners of International HDR Day Announced!

Eredeti: The Digital Photo Experience, Rick Sammon"

Hey Gang,


Trey Ratcliff and I have selected the 4 winning images, selected from the DPE Flickr group, for the first annual International HDR Day. If you have not been following around for the HDR fun, click here for info.


The prizes for the four winners are autographed copies of our HDR books and a 24-inch print of the image from Nations Photo Lab.


Below are the way-cool images and links to the images. As stated in our original announcement, the winners need to contact us. Shoot us an email at email hidden; JavaScript is required and email hidden; JavaScript is required. Please include your real name, phone number and shipping address in the email.


Thank you all for joining the HDR fun!


Explore the light,


Rick


Link.


Link.


Link.


Link.


"

A Bridge Just Far Enough: Adobe CS5 Mini Bridge - Photo Tips @ Earthbound Light

Eredeti: Earthbound Light, Bob Johnson

A Bridge Just Far Enough: Adobe CS5 Mini Bridge

The file management capabilities of Windows or Mac OS are fine for most tasks, but both pale in comparison to what you can do with your images while browsing them in Adobe Bridge. But if switching away from Photoshop to a separate application strikes you as overkill, Adobe has an answer for you. Introducing Adobe CS5 Mini Bridge.

The Mini Bridge Panel in Photoshop CS5If you can imagine Bridge living inside a panel much the way History, Layers and Channels exist as panels, you've got the right idea in mind. Yup, Adobe has given us Bridge in a panel. Panels are really "in" these days. In Photoshop CS4 Adobe gave us the Adjustments panel. In CS5, they've gone even further by squeezing Adobe Bridge into a Photoshop panel.

From within Photoshop CS5, you can get to the new Mini Bridge panel in any of several different ways. There's an icon to launch Mini Bridge on the top Photoshop menu bar right next to the icon to launch the full version of Bridge. You'll find it right below "Browse in Bridge..." on the File menu as File >> Browse in Mini Bridge. It's also on the Window menu as Window>> Extensions >> Mini Bridge. And of course if you've been to Mini Bridge before but have it currently collapsed, you can re-open it from the panels fly-out menu.

When you first open Mini Bridge, you'll see a rather plain looking "Browse Files" button, and an even plainer looking "Settings" button. There aren't many settings but it's worth taking a look so you know what's there. The settings are split into two groups: "Bridge Launching" and "Appearance." The former allows you to control various aspects of when and how Bridge should launch and, as you might expect, the latter gives you basic control over the appearance of the Mini Bridge interface. You can specify the background color and brightness of the panel and control whether you want images in Mini Bridge to be color managed. Thankfully, Adobe made color management on by default so even if you never visit the Mini Bridge Settings you're images will look the way you expect them to.

The "Browse Files" button launches the heart of Mini Bridge, opening up a display that should look familiar to users of the full version of Bridge. You'll probably want to drag the edges of the panel to enlarge it some since the default size is rather small. Once you do, you'll notice that the content is split into Navigation and Content. For lack of a better term I suppose, Adobe calls these "pods." All together, there are three pods in Mini Bridge. The Navigation and Content pods you've now already seen, and the Preview pod which can display a larger version of the image you have selected in the Content pod. The Preview pod is hidden by default which is where it probably belongs if you ask me. Unless you drag the sides of the Mini Bridge panel out until it fills a large portion of your screen the Preview image is unlikely to be that much bigger than the thumbnails in the Content pod. If you do want to see the Preview pod though, you can get there by using the Panel view control on the top menu bar in Mini Bridge. It's the one just to the left of the Search magnifying glass icon.

Mini Bridge CS5 menus and buttonsWhich brings me to the top menu bar in Mini Bridge. On the left side of the bar, you'll find the standard back and forward button to let you easily return to previously selected content windows, a more full featured control to let you easily get to the parent of the current window, one of your Bridge favorites, or other recently selected windows, a button that looks like a house to return you to the boring Home view of Mini Bridge where all that exists is the "Browse Files" and "Settings" buttons. Over on the right end of the top bar there's a button to launch the full version of Bridge, a Panel View button to let you select which pods you want to be visible, and a Search button to let you search your images in case the standard Mini Bridge navigation controls aren't getting you what you are after.

The Content pod itself has a number of additional button controls on its own menu bar as well as some on the bar underneath the Content pod image area. At the top you'll find a Selection control button, a Filter button to filter by rating, a Sort control, and a button to give you access to the Bridge Tools menu. Along the bottom, you'll find a slider to control the zoom size of the Content pod thumbnails, a button to launch the Bridge Review or Slideshow modes from within Mini Bridge, and a View button to let you switch the Content pod from the standard filmstrip mode to a thumbnail grid view, a simple list, or a detailed list with thumbnails and basic meta data.

If you double click on an image in Mini Bridge, it will open in Photoshop if it's of a type that Photoshop supports natively. If it's a raw file, it will open in Camera Raw.

When using Mini Bridge, be aware that Bridge is itself running in the background even if all you see is the Mini interface. Bridge isn't noted for being a small application and you may be wondering what benefit there is by using Mini Bridge at all. First, a good chunk of the memory that the full version of Bridge uses is the rendering of its user interface and Mini Bridge does cut down on that by keeping things light. But more importantly for me at least, Mini Bridge makes accessing my image files that much easier. If I have a lot of work to do on a collection of images, the full version of Bridge is great, but sometimes all I need is to quickly get at some image not already open in Photoshop, or perform some quick actions on a few images but don't want to switch completely out of what I'm doing in Photoshop.

Think of Mini Bridge as the File >> Open dialog you've long wished Photoshop had. Before Bridge was introduced, there was a Browse interface within Photoshop. Once Bridge came into being in Photoshop CS2, we got greater functionality, but it wasn't as easy to get to it. Finally, we've got easy access to Bridge from within Photoshop. Thanks Adobe!

A Light Mantra

Eredeti: The Digital Photo Experience, Rob Sheppard
"

I think one of the challenges that all photographers face is how to separate the subject from the photograph. A photograph can only be a representation, an interpretation of a subject. If we focus too much on the subject, we can miss the photograph.


This is especially common with landscape photography. I once had someone tell me that they did not have to worry about photographing nature, including landscapes, because nature was perfect and nothing more was needed. It may be true that nature is perfect, but photographs are not, and photographs are not nature. Landscapes can sit out in front of us, spectacular in what we see, then when we take a picture, we can be disappointed. A spectacular landscape does not automatically make for a spectacular photograph. The subject is not the same as the photograph.


One way to really help you see the photograph rather than simply the subject is to look for the light. Our eyes can see throughout even the darkest shadows and the brightest highlights of a landscape. The camera cannot (though HDR is a tool that can help). The camera wants to emphasize the light, especially its contrasts from bright light to shadow. If we go out to simply photograph landscapes, we can be disappointed, and no amount of gear, not even the latest multimegapixel wiz-bang camera, and no amount of software can help if we do not also see the light as the camera sees it.


So here is a mantra of sorts to keep in mind when photographing landscapes: Find the subject, find the light, and put them together in the photograph.


You can also find more about working with light and the landscape in my book, The Magic of Digital Landscape Photography.


And if you are interested in a really unique aspect of nature and its photography, check out my latest blog on the Ancient Bristlecone Forest at www.natureandphotography.com.

"

17 Beautiful Images with Shallow Depth of Field

Eredeti: Digital Photography School, Darren Rowse

One technique that many photographers use to add a ‘wow factor’ to their images is to shoot with a shallow depth of field. In doing so they isolate part of the shot which is nicely in focus while throwing elements in the background (and sometimes the foreground) out of focus and into a lovely blur. Here are a few shots that use the technique of shallow depth of field.

Image by purplemattfish

Image by enggul

Image by Thomas Shahan

Image by Dustin Diaz

Image by cszar

Image by philippe leroyer

Image by aussiegall

“]

Image by ~jjjohn~

Image by Amir K.

Image by Andross

“]

Image by LEO™

Image by conorwithonen

Image by Steve took it

Image by Merlijn Hoek

Image by RHiNO NEAL

God some shallow depth of field shots to add to the collection above? Feel free to share your best shallow depth of field image below.