How to Use Ultra-Wide Lenses
© 2008 KenRockwell.com. All rights reserved.
© 2008 KenRockwell.com. All rights reserved.

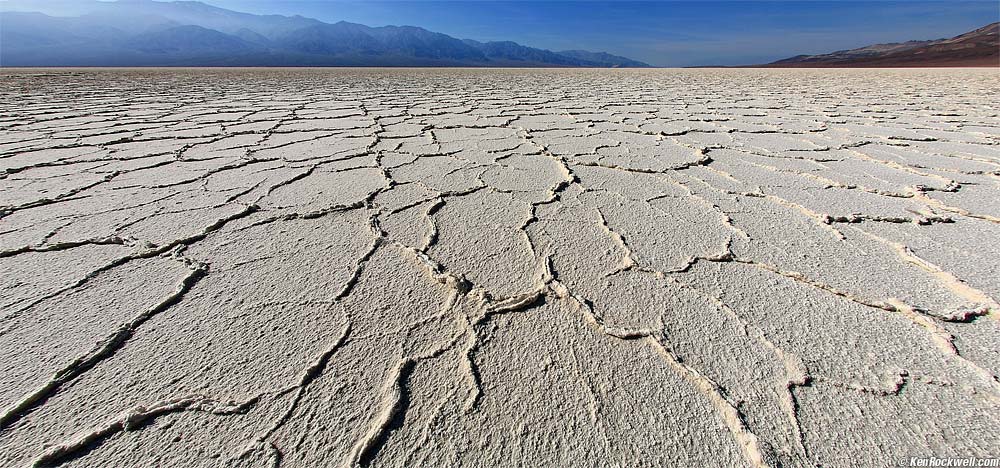
Badwater, Death Valley, California. I was only inches above the salt. (tech details)
August 2008 Nikon Reviews Canon Reviews Leica Reviews Pentax Reviews Ultrawide lenses are the most difficult lenses to use well. Ultrawides are not for "getting it all in." Ultrawides are for getting yourself, and therefore the viewer, right smack into the middle of something. Ultrawides are for putting next to the muzzle of Dirty Harry's revolver to put it in your face. If you can't or won't get close, leave the ultrawide at home. Ultrawides rub the viewer's nose in your subject. Properly used, ultrawides grab your viewer and yank him into the middle of your situation. Ultrawide lenses are for getting close and bringing the viewer into the photo, not for fitting a subject into a photo. Ultrawides are not for the faint of heart. For newsmen, ultrawides are for jamming into the face of an enraged wino brandishing a feces-covered broken bottle to exaggerate his crazed anger and crude weapon. Most people use ultrawides too sheepishly, and get crummy results with tiny subjects dwarfed in the middle of an open frame. When I use my 14mm I constantly have to force myself to get closer and pay rapt attention to the sides of my viewfinder, which are too often blank or loaded with junk. Ultrawides require you to get very close and personal to anything you are shooting. Even a fraction of an inch (or cm) will make a huge difference in your composition, so you need to be very deliberate with your movement.If you use them properly, you'll be rewarded with dynamic images. I've discovered that regardless of how many lenses I use, and however many photos I make on a trip, the ones I ultimately love the most are always the ones made with the widest lens I brought. My 17-35mm zoom always seems to be shot at 17mm, my 16-35mm always at 16mm, and my 14-24mm always seems to be at the 14mm stop. Your taste will vary, but this is how I see the world. How Wide is Wide All this becomes more important as your ultrawide gets wider. For 24mm lenses, you can ignore all of this. For 20mm lenses you ought to pay at least a little attention. For 17mm lenses you'll need most of this, and with 14mm lenses you need to know all this, otherwise the only good photos you'll probably get will be from dumb luck. Everything here applies to all lenses, however normal and tele lenses don't exhibit the crazy properties I'll be describing. The wider you get, the crazier things become and the more attentive you need to be. 28mm and 24mm lenses are still pretty normal as wide lenses go. If 24mm (16mm on DX and 1.6x) is your widest lens, you won't see or need much of what I'll discuss here. When you get to 20mm lenses (12mm on DX and 1.6x), things start to get a little weird. At 18mm and 17mm things are getting very weird, and by 15mm, 14mm and 13mm things are totally out of control. This is why some of us love ultrawide lenses, however you have to understand and be able to make productive use of the weirdnesses of ultrawide lenses. You have to shoot full-frame or FX to get the equivalent of 14mm; there are no lenses that wide for the little formats. What is an Ultrawide This article applies to all lenses, but here are today's definitions while I'm at it.
Distortion Ultrawides are not fisheyes. Fisheyes distort and curve everything. Ultrawides keep straight lines straight. Ultrawides don't distort technically, but they distort artistically. This is why we use them. Ultrawides exaggerate the relationship between near and far. Ultrawides stretch out objects on the sides and the corners. Ultrawides exaggerate any slight misalignment of your subject and camera. They do all this while keeping straight lines straight. This is why we love them! We exploit these distortions to our advantage. Getting it all in Most beginners, myself included for 15 years, think wide-angle lenses are for "getting it all in." They think that the wider the lens (or stitched panorama), the more encompassing, impressive, huge and all-enveloping will be the result.  Beginners know that wider lenses get more in, and so the pictures must be better. They know that 14mm lenses are expensive because pro organizations like ASMP mandate camera companies to charge more so that only pros can afford them and get the "good pictures." As a kid, I first got a 35mm wide angle, than a 25mm Lentar wide-angle, then a 24mm Minolta Rokkor-X wide angle, a 17mm Tokina in 1984 and then my ultimate, the 15mm Nikkor back in 1992. Oddly, my pictures sucked. Why is that? All that most people get with ultrawide lenses are parking lots in the bottom half of their image, and nothing anywhere except for the center. Worse, ultra-wides see all the distracting junk on the side of your subject and weaken the shot. The shot above is made in the middle of the Mojave Desert, so there isn't anything on the sides. I got lucky. The Easy Way The best photos most users get with ultrawides are made inside large spaces, like Grand Central Station or stately homes. These highly-detailed spaces usually make for fun photos regardless of where you put or point the camera.  Servants' Entrance, Typical Home, Dubai. Nikon D3, Nikon Ai Nikkor 13mm f/5.6s. These photos are fine, but let's learn how to get great photos everywhere.Scale Painters understand scale, but few photographers do. Scale means paying attention to the size at which an image will be printed as you're creating it. Images have entirely different meanings when printed at different sizes. A photo of a mouse printed at 4x6" (10x15cm) is normal. The same photo printed at 20x30" (50x75cm) is kind of weird. Why would someone make a print of a tiny mouse so big? The reason photos of the Grand Canyon usually lack the "you are there" feeling is because they are only printed a few feet wide at most. A 40x60" (1x1.5m) print is a big print, but still doesn't do the Grand Canyon justice. Show the Grand Canyon as an IMAX movie as shot from a moving helicopter, and the audience feels it. Panoramic stitching is making things worse today because anyone, even with most Canon point-and-shoots which come with free software, can make an image with nothing in it. In the old days, you had to buy a $2,000 lens. Let's face it: when you print that panorama at the same size as a normal image, doesn't it seem to lack the "you are there" feeling you used to get before easy panoramas? Big things need to be printed bigger. If you want to "get it all in," you'd better be prepared to print huge. If you aren't going to print huge, the only thing an exotic wide lens or panorama does is make the things in your picture too darn small. Even if you print 20 feet (6m) tall with ultrawide shots, you're still a long way away from making good images. Scale is only one of many basic elements of creating an image. Composition: Impact in Normal-Sized Images What makes a great image doesn't change with what lens you use. What changes with an ultra-wide lens is how much more difficult it is to get your subject framed the way you want it. 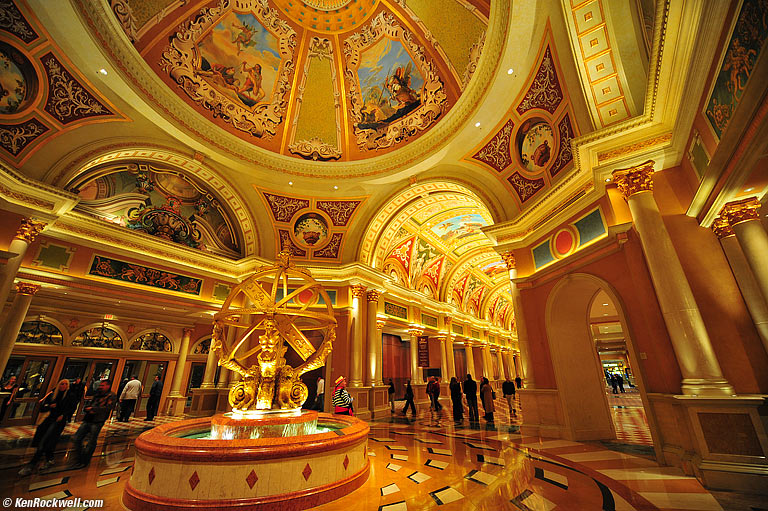 Most people would be perfectly happy with this shot, but look at the sides. Nothing. This shot really only has anything going on in the central square portion of the frame. I wasn't close enough. I walked into this place, said "wow," and popped off a few without thinking. I put the bottom of a column in the lower right, but I didn't get it to the bottom of my frame. I wasted the bottom inch on the right, and the entire left side is almost all devoid of anything meaningful. Who are the people in the lower left? Just like everything in life, if something isn't adding to the composition, it's taking away. The water thing was only 10 feet away, but it may as well have been a mile. Print this shot 20 feet tall and it will be impressive, but how can we make it stronger in the sizes we really use? Get Close! The hardest part with ultra-wides is getting close enough.You can never get too close! You have to push yourself to get and stay close enough.  For this shot, I was leaning over the edge of the fountain to get close enough to the astronomical device to use it as a compositional element. Of course this is all hand-held: a tripod would have gotten in the way, not worked well in the fountain, not allowed me the precision I needed in positioning the camera, and would have gotten me thrown out. Tripods aren't needed for digital. Not that this is a great shot, since the elements on each side are each fighting to pull your eyes out of the frame in opposite directions, but these snaps show how I have to approach every scene with an ultrawide. Watch your edges and make sure your subject fills the frame. I'm always amazed at just how much wasted space happens at the edge of my images unless I work at paying attention to the sides of my finder with a 14mm lens.If I get lazy, all I get is a smaller subject in the middle with loads of space between it and the frame edges. I wind up cropping, which just eliminated the whole point of using an ultrawide lens. Position With longer lenses, the direction in which you point the camera is the most critical element. With ultrawides, camera position is more critical. Even a fraction of an inch makes a huge difference in composition. I'm very serious: as I hand-hold my camera inches away from something, my breathing changes my composition. I have to be careful and shoot at just the right time. In the shot above, I'm only inches away from the naked lady. Forget tripods, unless you're using a macro positioning rail. Those rails only adjust in two directions, not all three, so you'll need a tripod with a geared-rise. Position has to be within fractions of an inch. I can't place a tripod that precisely. Ultrawides aren't like wide, normal and tele lenses where an inch or two makes no difference. Used up close, a half-inch can make or break a photo with an ultra-ultra wide. Watch your edges I don't look at the center of my image when composing. I have to keep looking at the edges to make sure things are close enough. When fine-tuning balance, I look away and compose out of the corner of my eye. It sounds silly, but this is important in abstracting your composition away from reality so you can see the basic structure of the image and make it strong. Lines Ultrawide shots are all about lines. Personally, if there are lines to be had, I seem to like having one leading in from the lower left corner. I prefer to have the lines enter from the corner itself, not one of the sides. This is just me. Even I'm surprised at how I consistently see the world this way. 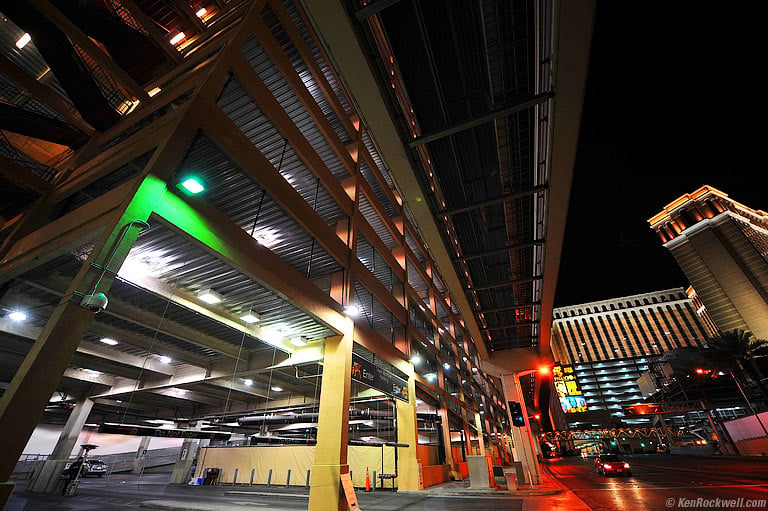 Somewhere in Las Vegas, Nevada, 29 January 2008. 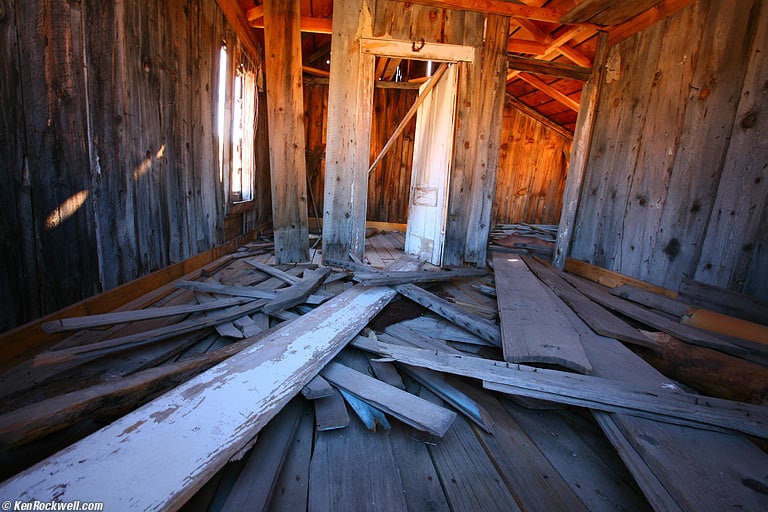 Bodie, California, 19 October 2007. Canon 5D, 16-35mm f/2.8 L II with Tiffen 812 warming filter at 16mm, f/11 @ 1 second (Av mode), hand-held (no stinking tripod!), no exposure compensation, ISO 100 (tech details). Exactly as shot in JPG. 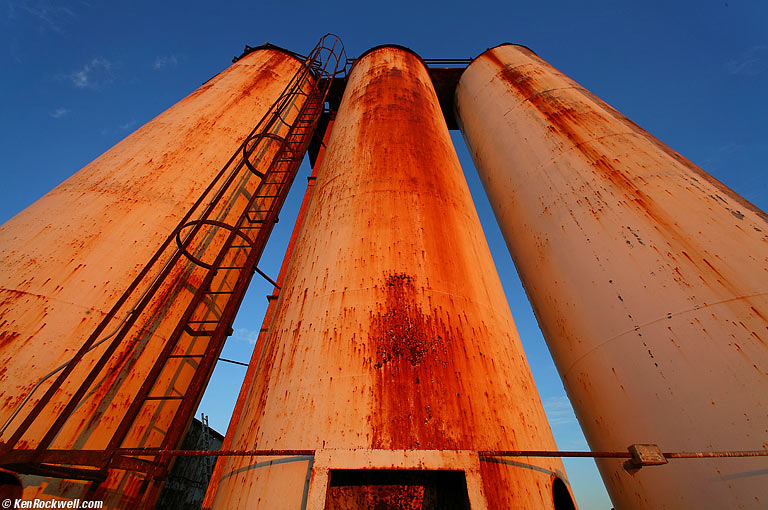 Chemical Plant, Amboy, California, 27 January 2007. Canon 5D, 14mm f/2.8L, f/11 @ 1/25, ISO 50, hand-held. (tech details.) 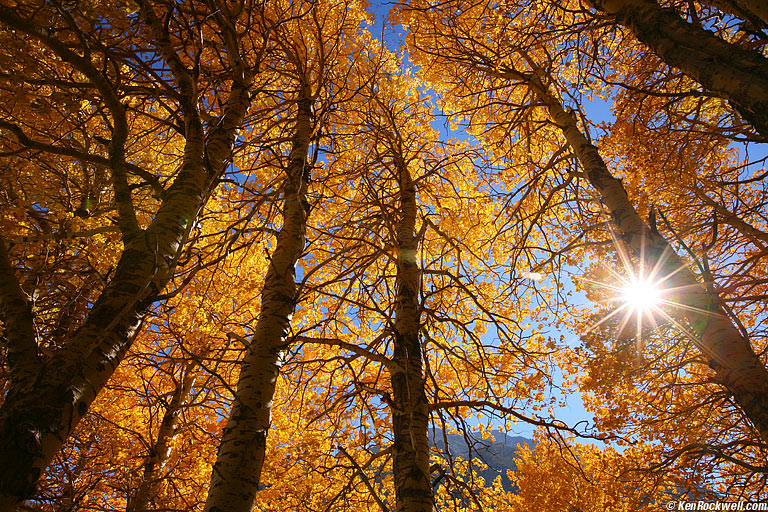 Eastern Sierra, California, 19 October 2007. Canon 5D, 16-35mm f/2.8 L II with Tiffen 812 warming filter at 23mm, f/16 @ 1/100 (Av mode), no exposure compensation, ISO 100, hand-held (tech details). Exactly as shot in JPG. Inclusion and ExclusionPainting is an art of inclusion, meaning that something only gets into the painting if the painter paints it that way. You can always tell a sloppy painter who's done watercolors from a photo because of all the needless junk. If you see telephone poles, crooked horizons and cars stopped in the middle of the street, it's obvious a painting was made from a snapshot. Photography is an art of exclusion, meaning that everything gets into your photo unless you go out of your way to exclude it. You must always watch for distractions. This takes experience, since by human nature we don't see these distractions until we get our pictures back. Most people point a camera directly at a subject and shoot. It takes training to look all over to ensure an image only includes what contributes to making it stronger. Ultrawides get everything in, whether we want them to or not. This is another reason they are so difficult to use well. Unlike more reasonable lenses, ultrawides have such huge depths-of-field that everything is in focus, even the unwanted junk up and down, left and right. When shooting ultrawide, watch your corners to fill the frame with what you want, and be sure that there isn't any distracting junk. Near-Far Relationships Long lenses compress perspective: they seem to squeeze everything into looking like it's in the same plane. Ultrawides do the opposite: they expand the apparent depth of an image. Shots made with ultrawides push back the background, and since you have to get close, pull near objects even closer. Ultrawide lenses exaggerate the difference between near and far. This is one of the main reasons we love them! The shot below is made with a 37mm wide lens. Roll your mouse over to see the same shot made with a 14mm ultra-ultra wide lens from a closer distance. See how everything becomes more exaggerated? This is the reason we use ultrawide lenses; it's not about getting it all in. 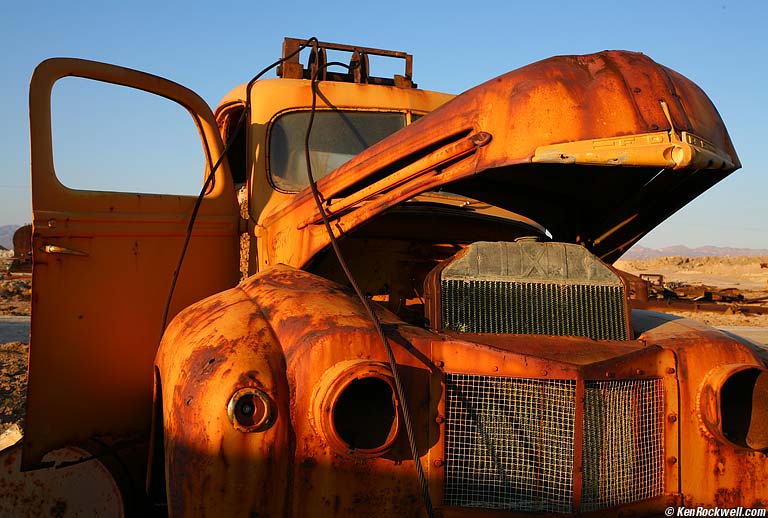 Old Truck, Amboy, California. (roll mouse over to compare at 14mm) Canon 5D, 14mm f/2.8L, f/13 @ 1/40, ISO 50, hand-held (tech details). See how the windshield appears twice as far away in the 14mm shot, but that the tip of the hood is now twice as close? I quadrupled the apparent depth by going from 37mm to 14mm and getting so close that I was almost under the hood. See how the door at the upper left and hood at the upper right just fit the frame in the 14mm shot? It took me quite a bit of gymnastics to get the camera in the right position, and it's critical to the image. See how the lit portion of the front just makes it to the bottom of the frame and cuts off before the frame edge? This is also a premeditated part of my composition. There's no way to do this in Photoshop or hack it in raw; you have to do this as you shoot. You do this by looking through the finder and carefully moving the camera. When making the 14mm shot I had to try a bunch of times because I kept moving slightly as I slipped into the mud. Expanding Space Exaggerating depth means that exteriors and interiors seem more spacious. A normal lens will just show a section of one wall of a room, while an ultrawide can show two, and often three, walls at once. The ultra-wide shot pushes the back wall back and makes a room look many times deeper than it is. An ultrawide will make a small back yard seem like a park. This effect is so powerful that you have to be careful. When I posted an online ad to rent out my old condo, I had people calling from all over the USA thinking it was such a deal because it looked cavernous. I had to explain this effect to them, but they didn't believe me and I people were calling from as far away as Pittsburgh trying to leave deposits, sight unseen. If you shoot real estate listings for a living, an ultrawide lens pays for itself fast.Sucked-out Corners The corners of ultra-wide shots look as if someone printed the image on a rubber sheet and pulled-out the sides and corners. If photographing people, beware that they'll look fat on the sides if standing (like the example of me below), or skinny if they're lying down, since the sucking stretches things towards the edges and especially the corners. Alignment Ultrawides exaggerate any misalignment between film plane and subject plane. Use this to your advantage. 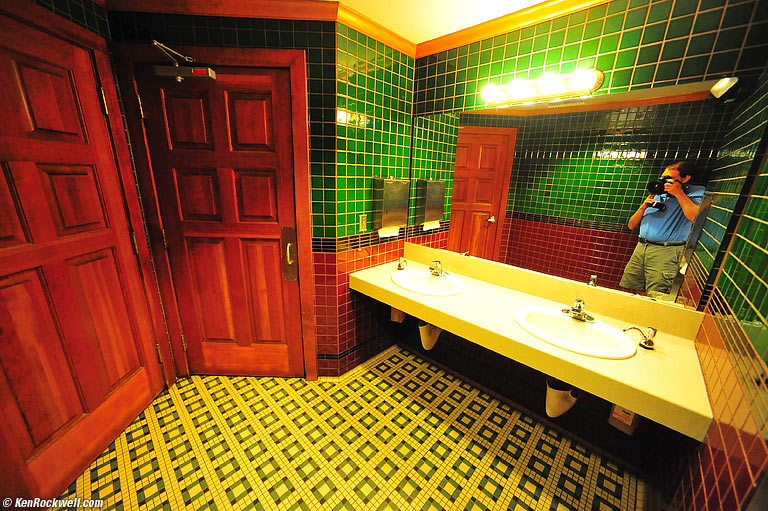 Potty Room. Nikon D3, Nikon Ai Nikkor 13mm f/5.6s. This snap looks pretty crazy, but the camera was pointed down only slightly. Even this slight tilt has forced all the lines to converge in crazy ways. If the camera is level, the results are boring: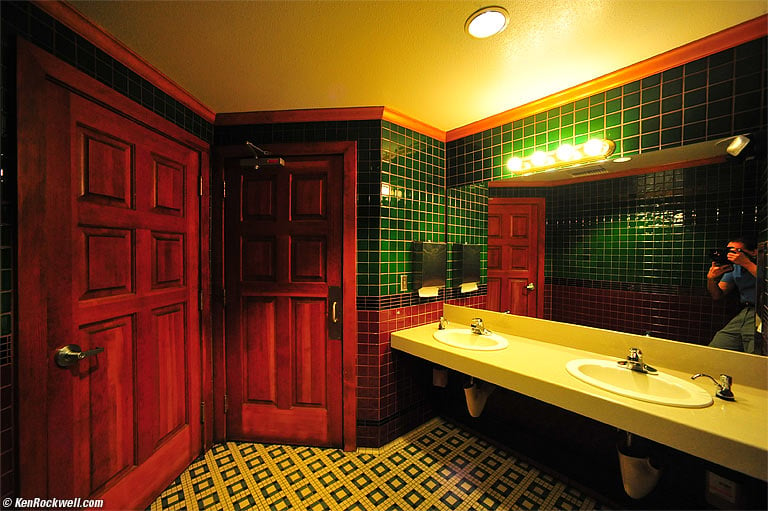 Potty Room ceiling. Nikon D3 held level, Nikon Ai Nikkor 13mm f/5.6s. Use this to your advantage: tilt up to look at buildings, and control the angles by how and where you tilt the lens. You can't do this with teles, so pay attention with ultrawides.Polarizing Filters Don't do it! The sky changes its polarization as you look from left to right. The sky has its largest amount of polarization, and thus polarizing filters have their greatest effect, at 90 degree angles from the sun. Used on normal and tele lenses, POL filters have more or less effect depending on where you point them. Used on lenses that can see a broad expanses of sky, a POL will render the more polarized areas much darker than the other areas. This causes nasty dark bands in the sky, and is why I never use a polarizer with an ultrawide lens. Synthetic Methods There are many ways to fake an ultrawide lens electronically. You can shoot stitched panoramas or stretch-outfisheye shots. These give the same results technically, but there is a huge catch: you can't see what you're doing as you compose. As you've learned, position, relationships, framing and composition are critical to making or breaking an ultrawide shot. You need instant feedback as you're positioning your camera in order to create a powerful image. If you use a fisheye, you don't know what's going to be included after the image is cropped by whatever software is doing the rectification. If you're hard-core, you could mask off a finder screen for shooting with a fisheye you intend to convert to rectilinear later, but you still can't see the crucial fundamentals of balance, line, and size relationships, since the fisheye lens alters these. I'll admit that my Death Valley shot at the top of the page was shot with a fisheye, but I composed it knowing my final intent was doing a rectilinear conversion, and there were no complex relationship or compositional issues involved. I also got lucky. Give up trying to predict what a final result will look like with stitching. Even after getting great single results like at Death Valley with a $600 fisheye on a Canon 5D and a few hundred dollars in software, I still prefer to use real ultrawide lenses so I can see what I'm doing. Recommended Gear Fisheyes with software: I dislike this way because it's too hard to guess composition, but it is the least expensive. The best setup is the Canon 5D and 15mm fisheye, which is far sharper than the Nikon D3 andNikon 16mm fisheye. You're going to need all the sharpness you can get in the corners when you stretch it out. Small-Format Digital: On Nikon, get the Tokina 11-16mm. On Canon, get the 10-22mm EF. FX Digital, Nikon: Get the 14-24mm. It's the world's best 14mm lens ever for 35mm format cameras. TheNikon 14mm f/2.8 is also great, but not not as sharp. Full-Frame Canon: I've used the original 14mm L, some of whose results I've shown above. The newer 14mm L II is supposed to be sharper in the corners if you can't shoot at smaller apertures as I do. Neither can use front filters, but the 16-35mm L II (examples also above) can. Film: Of course you can use 35mm cameras with the above lenses, but real film shooters use larger formats. My favorite hand-held camera is the Mamiya 7 with the spectacular 43mm lens is a favorite, although the goofy viewfinder setup requires me to move the camera into the same position as the finder before exposure for precise composition The best results of all of these technically are a 4x5" camera, on which I use a Schneider 75mm f/5.6 Super-Angulon lens from the 1960s. Another camera is the Horseman SW612 with Schneider 47mm XL. |
Nincsenek megjegyzések:
Megjegyzés küldése